Batch processing in SPM
Statistical Parametric Mapping (SPM) is a complete suite of Matlab functions that can be used for the analysis of brain imaging data from image preprocessing to statistical analysis. The software is made freely available to the neuroimaging community. It provides a graphical user interface (GUI) making it easier to use even for those who are not familiar with Matlab. On top of this, it also provides a powerful batch processing system, which is very handy especially when you are processing very large datasets. Just imagine running a single command in Matlab to process all the data you have from image preprocessing to statistical analysis. In this post, I will start with a simple example of how to create a script to process your data in batch using SPM. Specifically, I will illustrate this with image segmentation, the process of decomposing structural T1-weighted images into component images that include gray matter (GM), white matter (WM), and cerebrospinal fluid (CSF), among others.
Creating a template script
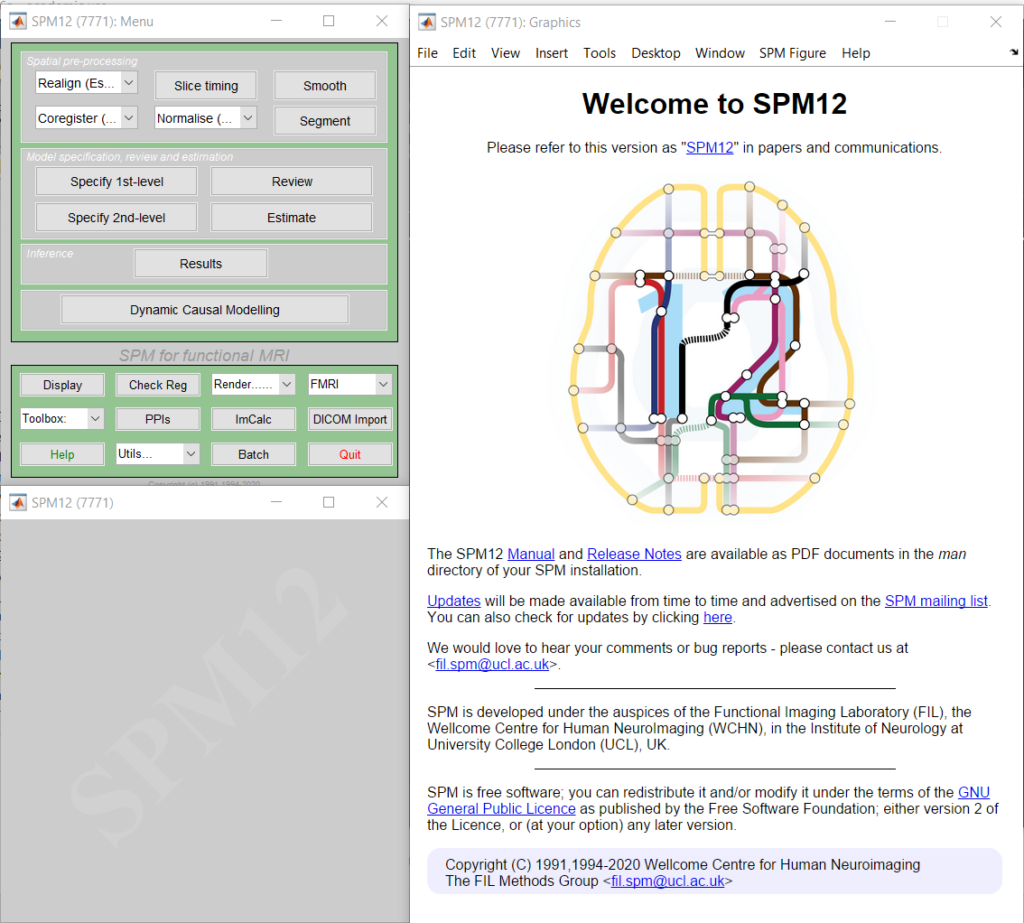
First, we need to create a template script. To do this, open SPM by typing spm fmri in Matlab’s prompt. This will open the SPM GUI (Figure 1) consisting of three windows. In the Menu window (top left), click the Segment button. This will open the Batch Editor window with the Segment module listed under Module List and the different options of this module listed on the right. Change the option values on the right according to the type of analysis you want to perform and the output you want to generate. It is always a good idea to output as many relevant images as possible if you have the space so that you don’t have to re-run segmentation again if you need the relevant images. Here are some of the options I usually choose for segmentation.
Data
. Channel
. . Volumes                                  <- X
:
. . Save Bias Corrected       Save Bias Corrected
Tissues
. Tissue
. . Tissue probability map ..\spm12\tpm\TPM.nii,1
. . Num Gaussian                                2
. . Native tissue        Native + Dartel Imported
. . Warped Tissue                       Modulated
. Tissue
. . Tissue probability map ..\spm12\tpm\TPM.nii,2
. . Num Gaussian                                2
. . Native tissue        Native + Dartel Imported
. . Warped Tissue                       Modulated
. Tissue
. . Tissue probability map ..\spm12\tpm\TPM.nii,3
. . Num Gaussian                                2
. . Native tissue        Native + Dartel Imported
. . Warped Tissue                       Modulated
. Tissue
. . Tissue probability map ..\spm12\tpm\TPM.nii,4
. . Num Gaussian                                3
. . Native tissue                    Native Space
. . Warped Tissue                     Unmodulated
. Tissue
. . Tissue probability map ..\spm12\tpm\TPM.nii,5
. . Num Gaussian                                4
. . Native tissue                    Native Space
. . Warped Tissue                     Unmodulated
. Tissue
. . Tissue probability map ..\spm12\tpm\TPM.nii,6
. . Num Gaussian                                2
. . Native tissue                    Native Space
. . Warped Tissue                     Unmodulated
Warping & MRF
.  Clean Up                        Thorough Clean
:
. Deformation Fields            Inverse + Forward
In the options above, keep Data -> Channels -> Volumes (line 3) unspecified (<- X). This information will be filled up in the script. In line 5, I selected Save Bias Corrected. The bias-corrected image will be useful as the reference image when co-registering all functional images to the anatomical image. For tissues 1, 2, and 3, which correspond to GM, WM, and CSF, respectively, I selected Native + Dartel Imported for Native Tissue option (lines 10, 15, and 20). If you want to run DARTEL for VBM analysis later, the Dartel Imported image output will be needed. The Native image output will be useful for creating mask in native space or subject space and in estimating total volumes for each tissue component. For Warped Tissue, I selected Modulated for GM, WM, and CSF (lines 11, 16, and 21). The output of this will be the modulated image in the template space. You can smooth this image and use it for VBM analysis. Finally, for the Deformation Fields, I selected the Inverse + Forward option (line 40). This will be useful to transform images from subject space to template space and vice versa.
After specifying all the relevant options, you can now save the batch to file. In the Batch Editor’s menu, select File -> Save Batch and Script. Specify the filename of your batch in the Script Filename dialog box. Here, let’s just call it as abk_segment. This will save two files called abk_segment.m and abk_segment_job.m. See list below. The latter file (File 2), which I will call here as the job file, contains the specifications of the batch, that is, the options you specified in the Batch Editor. If you open this file in the Matlab Editor, you can see the different options you specified earlier. One of the options has '<UNDEFINED>' value (line 6). This is an option that you still need to specify, which can be done in the other file (File 1).
File 1. abk_segment.m
% List of open inputs
% Segment: Volumes - cfg_files
nrun = X; % enter the number of runs here
jobfile = {'C:\Users\baggy\Documents\workdir\Projects\Segment\abk_segment_job.m'};
jobs = repmat(jobfile, 1, nrun);
inputs = cell(1, nrun);
for crun = 1:nrun
    inputs{1, crun} = MATLAB_CODE_TO_FILL_INPUT; % Segment: Volumes - cfg_files
end
spm('defaults', 'FMRI');
spm_jobman('run', jobs, inputs{:});
File 2. abk_segment_job.m
%-----------------------------------------------------------------------
% Job saved on 27-Jun-2020 15:11:35 by cfg_util (rev $Rev: 7345 $)
% spm SPM - SPM12 (7771)
% cfg_basicio BasicIO - Unknown
%-----------------------------------------------------------------------
matlabbatch{1}.spm.spatial.preproc.channel.vols = '<UNDEFINED>';
matlabbatch{1}.spm.spatial.preproc.channel.biasreg = 0.001;
matlabbatch{1}.spm.spatial.preproc.channel.biasfwhm = 60;
matlabbatch{1}.spm.spatial.preproc.channel.write = [0 1];
matlabbatch{1}.spm.spatial.preproc.tissue(1).tpm = {'C:\Apps\spm12\tpm\TPM.nii,1'};
matlabbatch{1}.spm.spatial.preproc.tissue(1).ngaus = 2;
matlabbatch{1}.spm.spatial.preproc.tissue(1).native = [1 1];
matlabbatch{1}.spm.spatial.preproc.tissue(1).warped = [0 1];
matlabbatch{1}.spm.spatial.preproc.tissue(2).tpm = {'C:\Apps\spm12\tpm\TPM.nii,2'};
matlabbatch{1}.spm.spatial.preproc.tissue(2).ngaus = 2;
matlabbatch{1}.spm.spatial.preproc.tissue(2).native = [1 1];
matlabbatch{1}.spm.spatial.preproc.tissue(2).warped = [0 1];
matlabbatch{1}.spm.spatial.preproc.tissue(3).tpm = {'C:\Apps\spm12\tpm\TPM.nii,3'};
matlabbatch{1}.spm.spatial.preproc.tissue(3).ngaus = 2;
matlabbatch{1}.spm.spatial.preproc.tissue(3).native = [1 1];
matlabbatch{1}.spm.spatial.preproc.tissue(3).warped = [0 1];
matlabbatch{1}.spm.spatial.preproc.tissue(4).tpm = {'C:\Apps\spm12\tpm\TPM.nii,4'};
matlabbatch{1}.spm.spatial.preproc.tissue(4).ngaus = 3;
matlabbatch{1}.spm.spatial.preproc.tissue(4).native = [1 0];
matlabbatch{1}.spm.spatial.preproc.tissue(4).warped = [1 0];
matlabbatch{1}.spm.spatial.preproc.tissue(5).tpm = {'C:\Apps\spm12\tpm\TPM.nii,5'};
matlabbatch{1}.spm.spatial.preproc.tissue(5).ngaus = 4;
matlabbatch{1}.spm.spatial.preproc.tissue(5).native = [1 0];
matlabbatch{1}.spm.spatial.preproc.tissue(5).warped = [1 0];
matlabbatch{1}.spm.spatial.preproc.tissue(6).tpm = {'C:\Apps\spm12\tpm\TPM.nii,6'};
matlabbatch{1}.spm.spatial.preproc.tissue(6).ngaus = 2;
matlabbatch{1}.spm.spatial.preproc.tissue(6).native = [1 0];
matlabbatch{1}.spm.spatial.preproc.tissue(6).warped = [1 0];
matlabbatch{1}.spm.spatial.preproc.warp.mrf = 1;
matlabbatch{1}.spm.spatial.preproc.warp.cleanup = 2;
matlabbatch{1}.spm.spatial.preproc.warp.reg = [0 0.001 0.5 0.05 0.2];
matlabbatch{1}.spm.spatial.preproc.warp.affreg = 'mni';
matlabbatch{1}.spm.spatial.preproc.warp.fwhm = 0;
matlabbatch{1}.spm.spatial.preproc.warp.samp = 3;
matlabbatch{1}.spm.spatial.preproc.warp.write = [1 1];
matlabbatch{1}.spm.spatial.preproc.warp.vox = NaN;
matlabbatch{1}.spm.spatial.preproc.warp.bb = [NaN NaN NaN
                                              NaN NaN NaN];
Completing the script
You can now edit the other file, abk_segment.m, using the Matlab Editor. The edited file is given in File 3 below. First, I make it into a function so that it can be called by other scripts (line 1). The function has one input parameter called infn, which is the filename of the anatomical T1-weighted image that you want to segment. In line 10, we specify the location of the job file. This is the full path of File 2 above. In lines 15 – 17, I initialize SPM, then set the cmdline option to true in line 16 so that SPM will not open any windows, and then initialize the batch system in line 17. Next, the missing option in the batch file is specified in line 20 in the inputs variable, which is a cell that contains only one element since there is only one missing option, the filename of the T1-weighted image. This missing option is specified using the only input parameter of the script. Finally, the batch is run in line 23. To run this script, you just type abk_segment('anat.nii') in Matlab’s prompt, where anat.nii as the filename of your T1-weighted image. Make sure that the script is in Matlab’s path or in the current working directory.
File 3. Edited abk_segment.m
function abk_segment(infn)
% function abk_segment(infn)
%
% script to segment T1-weighted images
% infn is the filename of the T1-weighted image

% List of open inputs
% Segment: Volumes - cfg_files
nrun = 1; % enter the number of runs here
jobfile = {'C:\Users\baggy\Documents\workdir\Projects\Segment\abk_segment_job.m'};
jobs = repmat(jobfile, 1, nrun);
inputs = cell(1, nrun);

% initialize SPM
spm('defaults', 'FMRI');
spm_get_defaults('cmdline',true);
spm_jobman('initcfg');

% specify input
inputs{1,1} = cellstr(infn);

% run the batch job
spm_jobman('run', jobs, inputs{:});
Fine tuning the script
It is possible to fine tune the script further. If you examine File 2, the location of SPM’s template file, the TPM.nii, is hard-coded in to the script (lines 10, 14, 18, 22, 26, and 30). This is also the case in File 3 for the full path of the job file (line 10). This will be a problem if you move the script to some other location or used it in another computer where SPM is located in a different folder. To make the script more flexible, you can modify the batch specification file as follows:
File 4. Modified abk_segment_job.m
%-----------------------------------------------------------------------
% Job saved on 27-Jun-2020 15:11:35 by cfg_util (rev $Rev: 7345 $)
% spm SPM - SPM12 (7771)
% cfg_basicio BasicIO - Unknown
%-----------------------------------------------------------------------
matlabbatch{1}.spm.spatial.preproc.channel.vols = '<UNDEFINED>';
matlabbatch{1}.spm.spatial.preproc.channel.biasreg = 0.001;
matlabbatch{1}.spm.spatial.preproc.channel.biasfwhm = 60;
matlabbatch{1}.spm.spatial.preproc.channel.write = [0 1];
matlabbatch{1}.spm.spatial.preproc.tissue(1).tpm = '<UNDEFINED>';
matlabbatch{1}.spm.spatial.preproc.tissue(1).ngaus = 2;
matlabbatch{1}.spm.spatial.preproc.tissue(1).native = [1 1];
matlabbatch{1}.spm.spatial.preproc.tissue(1).warped = [0 1];
matlabbatch{1}.spm.spatial.preproc.tissue(2).tpm = '<UNDEFINED>';
matlabbatch{1}.spm.spatial.preproc.tissue(2).ngaus = 2;
matlabbatch{1}.spm.spatial.preproc.tissue(2).native = [1 1];
matlabbatch{1}.spm.spatial.preproc.tissue(2).warped = [0 1];
matlabbatch{1}.spm.spatial.preproc.tissue(3).tpm = '<UNDEFINED>';
matlabbatch{1}.spm.spatial.preproc.tissue(3).ngaus = 2;
matlabbatch{1}.spm.spatial.preproc.tissue(3).native = [1 1];
matlabbatch{1}.spm.spatial.preproc.tissue(3).warped = [0 1];
matlabbatch{1}.spm.spatial.preproc.tissue(4).tpm = '<UNDEFINED>';
matlabbatch{1}.spm.spatial.preproc.tissue(4).ngaus = 3;
matlabbatch{1}.spm.spatial.preproc.tissue(4).native = [1 0];
matlabbatch{1}.spm.spatial.preproc.tissue(4).warped = [1 0];
matlabbatch{1}.spm.spatial.preproc.tissue(5).tpm = '<UNDEFINED>';
matlabbatch{1}.spm.spatial.preproc.tissue(5).ngaus = 4;
matlabbatch{1}.spm.spatial.preproc.tissue(5).native = [1 0];
matlabbatch{1}.spm.spatial.preproc.tissue(5).warped = [1 0];
matlabbatch{1}.spm.spatial.preproc.tissue(6).tpm = '<UNDEFINED>';
matlabbatch{1}.spm.spatial.preproc.tissue(6).ngaus = 2;
matlabbatch{1}.spm.spatial.preproc.tissue(6).native = [1 0];
matlabbatch{1}.spm.spatial.preproc.tissue(6).warped = [1 0];
matlabbatch{1}.spm.spatial.preproc.warp.mrf = 1;
matlabbatch{1}.spm.spatial.preproc.warp.cleanup = 2;
matlabbatch{1}.spm.spatial.preproc.warp.reg = [0 0.001 0.5 0.05 0.2];
matlabbatch{1}.spm.spatial.preproc.warp.affreg = 'mni';
matlabbatch{1}.spm.spatial.preproc.warp.fwhm = 0;
matlabbatch{1}.spm.spatial.preproc.warp.samp = 3;
matlabbatch{1}.spm.spatial.preproc.warp.write = [1 1];
matlabbatch{1}.spm.spatial.preproc.warp.vox = NaN;
matlabbatch{1}.spm.spatial.preproc.warp.bb = [NaN NaN NaN
                                              NaN NaN NaN];
All the filenames are replaced with '<UNDEFINED>' values so that these filenames can be specified in the main script. Now there are 7 unspecified options in the batch specification file. The abk_segment.m file needs to be modified too. The modified version of the script is given in File 5.
File 5. Modified abk_segment.m
function abk_segment(infn)
% function abk_segment(infn)
%
% script to segment T1-weighted images
% infn is the filename of the T1-weighted image to segment

% first we need to get the location of SPM
str = which('spm');
if isempty(str)
    fprintf('Cannot locate SPM. Make sure SPM is in Matlab''s path\n');
    return;
end
[spmdn,~,~] = fileparts(str);

% next we need to get the fullpath of the script
fn = mfilename('fullpath');
[scriptdn,scriptfn,~] = fileparts(fn);

% List of open inputs
% Segment: Volumes - cfg_files
nrun = 1; % enter the number of runs here
jobfile = {fullfile(scriptdn, [scriptfn '_job.m'])};
jobs = repmat(jobfile, 1, nrun);
inputs = cell(7, nrun);

% initialize SPM
spm('defaults', 'FMRI');
spm_get_defaults('cmdline',true);
spm_jobman('initcfg');

inputs{1,1} = cellstr(infn);

% SPM12 TPM paths
inputs{2,1} = cellstr(fullfile(spmdn,'tpm','TPM.nii,1'));
inputs{3,1} = cellstr(fullfile(spmdn,'tpm','TPM.nii,2'));
inputs{4,1} = cellstr(fullfile(spmdn,'tpm','TPM.nii,3'));
inputs{5,1} = cellstr(fullfile(spmdn,'tpm','TPM.nii,4'));
inputs{6,1} = cellstr(fullfile(spmdn,'tpm','TPM.nii,5'));
inputs{7,1} = cellstr(fullfile(spmdn,'tpm','TPM.nii,6'));

spm_jobman('run', jobs, inputs{:});
The script still accepts a single input parameter corresponding to the filename of the T1-weighted image to segment. In lines 8 – 13, it checks if SPM is in Matlab’s path, and if it is, it extracts the location into spmdn. Otherwise, it prints a message that it cannot find SPM and quits. In line 16, it retrieves its full path and assigns the folder component to scriptdn and the filename without its extension to scriptfn. The location of the job file, which is assumed to be in the same folder as the script, is constructed from these information (line 22). In this way, even if the files are moved, as long as both are in the same folder, the script can still find the job file. From lines 34 – 39, the missing options in the batch specification file are specified in the inputs variable. The order the inputs are specified should correspond to the order in the job file.
Wrapping it up
You now have a working script that will do segmentation. If you want to segment several T1-weighted images, you can use the abk_segment() function in a loop specifying a different image to segment each time. Here is a wrapper script, called segment.m, that will read a text file containing a list of all images to segment, one image per line. An example list file is shown in File 7. The script will also create a subdirectory called SegSPM12 within the directory of the image file where all output images will be stored. To run the script, you just need to type segment in Matlab’s prompt, making sure that the script is saved in the current directory or in Matlab’s path.
File 6. segment.m
% performs segmentation using SPM12

% get filename of file containing list of images to segment
[fn,dn] = uigetfile('*.txt','Select text file containing list of images');
if isequal(fn,0) || isequal(dn,0)
    fprintf('Operation cancelled.\n');
    return;
end
listfn = fullfile(dn,fn);

% open file for reading
fid = fopen(listfn,'r');
if fid == -1
    fprintf('Error opening file %s\n',listfn);
    return;
end

% read file content one line at a time
subjId = cell(1,1);
ctr = 1;
str = fgetl(fid);
while str ~= -1
    subjId{ctr,1} = str;
    str = fgetl(fid);
    ctr = ctr+1;
end
fclose(fid);
numSubj = length(subjId);

% loop over images to segment
for ctr=1:numSubj

    % get directory and filename
    [dn,fn,ext] = fileparts(subjId{ctr});

    % create working directory where all output files will be stored
    wdir = fullfile(dn,'SegSPM12');
    if exist(wdir,'dir') ~= 7
        mkdir(wdir);
    end

    % copy the original image to the working directory
    ffn = fullfile(dn,[fn ext]);
    if exist(ffn,'file') == 2
        tfn = fullfile(wdir,[fn ext]);
        copyfile(ffn,tfn);

        % run segmentation
        abk_segment(tfn);
    end
end
File 7. An example text file containing a list of all images to process
C:\Users\baggy\Documents\Projects\analysis\data\s001\anat.nii
C:\Users\baggy\Documents\Projects\analysis\data\s002\anat.nii
C:\Users\baggy\Documents\Projects\analysis\data\s003\anat.nii
C:\Users\baggy\Documents\Projects\analysis\data\s004\anat.nii
C:\Users\baggy\Documents\Projects\analysis\data\s005\anat.nii
C:\Users\baggy\Documents\Projects\analysis\data\s006\anat.nii
Finally, to use the scripts in this post, you need to save Files 4, 5, and 6, then create the text file containing the list of images to process (an example shown in File 7), and run segment in Matlab to process all the images in the list file. You can specify as many images as you like.
1 Response
[…] Next, we will want to create the batch file that feeds into spm. You will need to specify a few variables, which can be done from the GUI to generate these batch files. Because I already generated these from the GUI a while back, I’m going to use the scripts directly. But more info about batch processing with the GUI can be found here. […]